Your garage floor takes a beating. It endures oil drips, moisture, temperature swings, and heavy foot traffic, often without any real protection. A cracked, stained concrete slab isn’t just ugly: it’s a maintenance headache and a safety hazard. The good news? Garage flooring ideas have evolved far beyond “leave it bare.” Whether you’re converting your garage into a living space, building a workshop, or simply want a floor that doesn’t look like a parking lot, there’s a solution that fits your budget, skill level, and style. Let’s walk through seven practical options that actually hold up to real garage life.
Table of Contents
ToggleKey Takeaways
- Epoxy coatings are the most durable garage flooring option, creating a sealed surface that resists oil, stains, and moisture while requiring proper surface preparation and temperature control during installation.
- Polished concrete offers a modern, low-maintenance aesthetic at $2–$4 per square foot and works best when the underlying slab is already in good condition.
- Rubber tiles and interlocking plastic tiles provide the easiest DIY installation, with rubber offering superior durability and comfort for workshops or gyms, while plastic is best for temporary coverage.
- Concrete sealers are the most budget-friendly garage flooring solution at $0.50–$1 per square foot, but they require reapplication every 1–3 years and work best for renters or short-term protection.
- Ceramic and porcelain tiles deliver lasting aesthetic appeal and moisture resistance but require professional installation and a perfectly level concrete substrate to prevent cracking.
- Choose garage flooring based on your specific needs: durability and chemistry resistance point to epoxy, living space conversions favor polished concrete or tiles, and workspace functionality calls for rubber or plastic options.
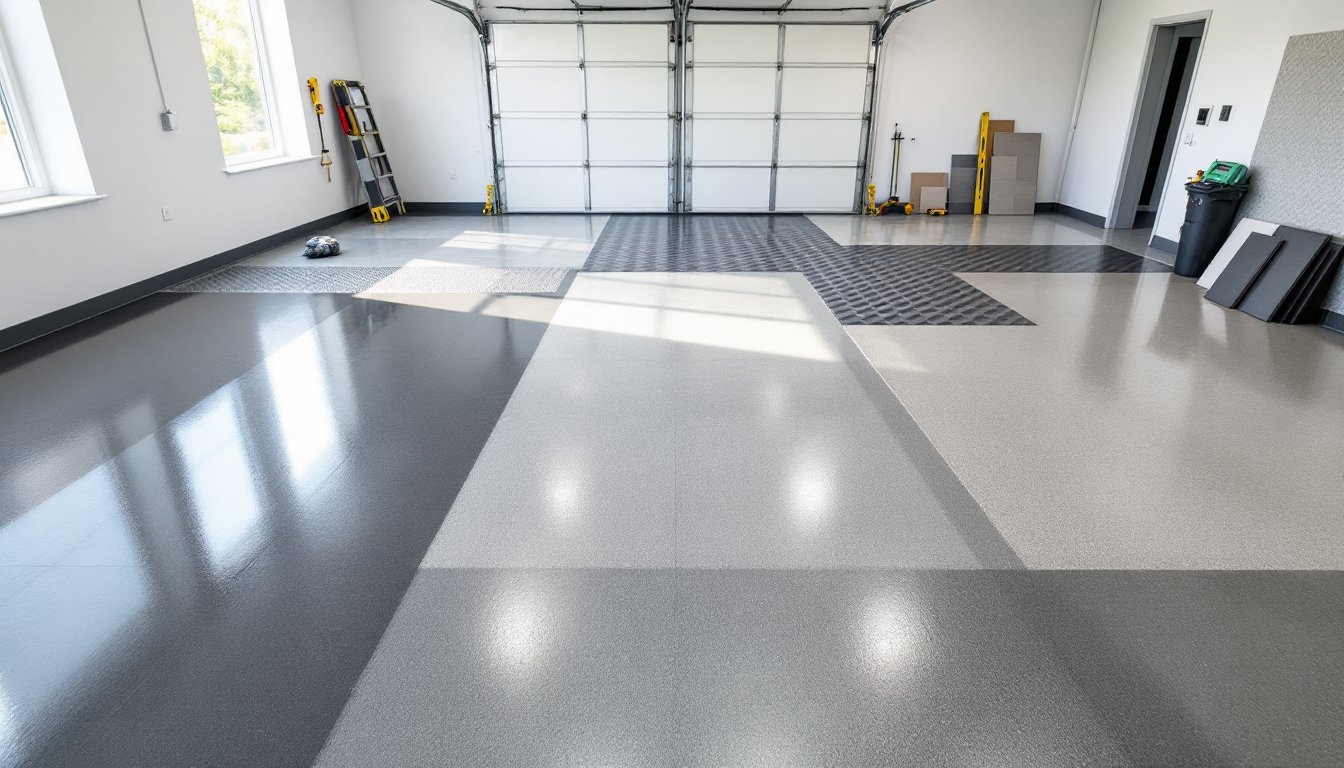
Epoxy Coatings for Durability and Shine
Epoxy is the workhorse of garage flooring. It’s a two-part resin system that chemically bonds to concrete, creating a hard, glossy finish that resists stains, chemicals, and moisture. You’ll see epoxy in professional garages, workshops, and show car collections for good reason.
The appeal is straightforward: epoxy seals concrete pores, prevents oil and water penetration, and wipes clean in seconds. A fresh coat transforms a dingy slab into something that looks intentional. Coverage runs about 300–400 square feet per gallon, so a typical 400-square-foot garage needs 1–2 gallons of epoxy product.
Installation is a DIY project if you’re detail-oriented. Surface prep is everything. You’ll need to grind or acid-etch the concrete to open the pores, this is non-negotiable. Etch the floor, rinse thoroughly, let it dry completely (24–48 hours in low humidity), then apply primer and epoxy according to the manufacturer’s specs. Two coats is standard. Work in 75–85°F temperatures: too cold and epoxy won’t cure properly.
Downsides? Epoxy can be slippery when wet, especially glossy finishes. Many DIYers add anti-slip grit to the topcoat. Also, quality epoxy isn’t cheap, expect $1.50–$3 per square foot for materials, plus tool rental for grinding. If humidity is high where you live, epoxy can blister during curing. Proper ventilation and moisture testing prevent this headache.
Polished Concrete for a Modern Look
Polished concrete has moved beyond the industrial aesthetic. It’s now a legitimate design choice that works in modern garages, creative studios, and even homes being converted to open-plan living. Polishing involves grinding the concrete surface with progressively finer diamond abrasives, then sealing it.
The look is sleek: a subtle sheen that highlights the concrete’s natural color and texture. It’s also low-maintenance. No coatings to chip or peel, just occasional damp-mopping. Unlike paint or epoxy, you’re not covering the slab, you’re refining it.
Polishing requires specialized equipment and skill. You’ll want a professional for this one unless you’re renting a floor polisher and tackling a small area yourself. Expect to pay $2–$4 per square foot for professional polishing, which includes concrete repair, grinding, and sealing. The job takes 2–5 days depending on concrete condition.
Polished concrete works best when the underlying slab is in decent shape. Deep cracks, severe stains, or uneven surfaces limit results. For garages with solid concrete, it’s a game-changer. The sealed finish resists moisture and staining, though it’s not quite as impervious as epoxy. If you’re planning a garage conversion or want a floor that reads “intentional,” polished concrete delivers without the high gloss of epoxy.
Rubber Tiles and Mats for Comfort and Functionality
Rubber flooring is practical if you’re creating a workshop, crossfit area, or home gym in your garage. It absorbs shock, dampens noise, and provides traction even when wet or oily. Rubber tiles interlock or lay loose over concrete: rubber mats roll out and can be repositioned.
These products come in standard thicknesses: ½-inch, ¾-inch, or 1-inch tiles, with ½-inch being most common for garages. Interlocking rubber tiles have a click-together edge that makes installation a one-person job. Roll-out mats work well for defined workout zones but shift under heavy traffic.
Installation is straightforward. Clean and level the concrete first. Loose debris prevents proper seating. Interlocking tiles press together, no adhesive needed unless you want permanence. Mats simply unroll. Start at one corner and work across, checking for level as you go.
The honest trade-off: rubber costs more upfront ($3–$6 per square foot installed) but requires almost no maintenance. It won’t crack or peel. Spilled oil wipes off. The surface stays cushioned and quiet. If you’re converting your garage to a workspace where you’ll stand for hours, rubber is worth the investment. For pure storage, it’s overkill. Rubber also holds moisture underneath in humid climates, ensure your concrete isn’t weeping, or mold can develop beneath tiles.
Interlocking Plastic Tiles for Easy Installation
Interlocking plastic tiles are the simplest DIY flooring option. They snap together like a puzzle, require zero curing time, and can be removed or rearranged anytime. You’ll find them in garages, playrooms, and finished basements everywhere.
These tiles come in various thicknesses (⅜-inch to ¾-inch) and snap or lock together with a click or slide mechanism. Most don’t require adhesive or underlayment on concrete. You can install a 400-square-foot garage in an afternoon if you have help.
The process is literally tile-and-snap. Clean the concrete. Start at a corner and work across the room, pressing each tile firmly into its neighbor. Some tiles have beveled edges: others are flat. Check your manufacturer’s design. If the last row doesn’t fit, you’ll cut tiles with a utility knife or circular saw, straightforward for most DIYers.
Plastic tiles come with real limitations. They’re not as durable as epoxy or rubber for heavy machinery or vehicles. Under concentrated weight, they can crack or warp over time. They also aren’t suitable if you’re storing a car regularly, tire marks and heat don’t play well with plastic. Moisture wicks underneath if the concrete is damp. Cost runs $1–$3 per square foot, making plastic one of the cheapest options. Best use case: temporary coverage, workshop flooring, or a casual workspace where durability demands are modest.
Sealed Concrete for Budget-Friendly Protection
If you want to avoid sanding, grinding, or complex prep work, a concrete sealer is the most forgiving entry-level option. Sealers are liquid coatings that sit atop concrete, filling surface pores and creating a protective barrier against water, salt, and oils.
Sealing concrete is achievable in a weekend. You need a clean, dry surface (pressure wash if necessary, then let it dry 48 hours). Apply sealer with a roller or sprayer in thin, even coats. Most sealers require 2 coats. Dry time is 24 hours between coats. Foot traffic is allowed after 24 hours, but heavy use should wait 72 hours.
The catch: sealer isn’t as durable as epoxy or polished finishes. It lasts 1–3 years depending on traffic and moisture. Reapplication is straightforward but recurring. Water-based sealers are easier to apply and less toxic: solvent-based versions last longer but smell stronger and require better ventilation.
Cost is rock-bottom: $0.50–$1 per square foot for materials. If your concrete is stained, a high-quality acrylic or polyurethane sealer can improve its appearance significantly, especially on newer slabs. Sealed concrete is ideal if you’re renting, testing the waters before a major flooring investment, or simply need a quick moisture barrier without aesthetic ambition. For a garage conversion where the floor will be seen frequently, sealing alone isn’t ideal, pair it with a rug or another flooring layer for better visual impact.
Specialty Flooring Options Worth Considering
Beyond the mainstream choices, a few specialty materials deserve mention if your garage project has specific demands.
Ceramic or Porcelain Tiles
Ceramic and porcelain tiles are durable, easy to clean, and available in endless styles. Porcelain is denser and more stain-resistant than ceramic, making it the better choice for a garage. ¾-inch-thick porcelain withstands temperature swings and machinery vibration.
Tiling a garage floor is a skilled trade. Proper substrate prep, thinset mortar, grout spacing, and slope for drainage all matter. Unless you’ve tiled before, hiring a professional is worthwhile. Costs run $3–$6 per square foot installed. Tiles don’t forgive an uneven subfloor, any high spots will crack tiles or grout. Concrete must be level within ⅛-inch over 10 feet.
Tiles shine in garages where moisture is a concern or where you want a finished aesthetic that carries into adjacent living spaces. They’re permanent, low-maintenance, and add real value if you’re doing a full garage conversion. The downside is rigidity, falling tools break tiles, and repairs mean replacing individual units.
If you’re sourcing materials, resources like ImproveNet can connect you with local tile contractors and help estimate project costs. Before committing, confirm your concrete is structurally sound and that you’ve tested for moisture. Tiles over a damp slab are a recipe for failure.