Converting a garage into a bedroom is one of the smartest ways to add functional living space without the cost and hassle of a full addition. Whether you’re looking for an extra guest room, a home office, or a rental unit, a garage bedroom conversion can unlock valuable square footage already on your property. But success hinges on three things: understanding local codes, planning the layout thoughtfully, and executing the build with care. This guide walks you through every stage of the process, from initial assessment through finishing details.
Table of Contents
ToggleKey Takeaways
- Verify local zoning laws and building codes before starting any garage bedroom conversion, as requirements vary by location and may mandate egress windows, ceiling heights, or minimum parking spaces.
- A legal bedroom must meet minimum floor area (typically 70–90 square feet), 7-foot minimum width, and 7–8 feet of ceiling height for both code compliance and livable comfort.
- Seal the concrete slab with a moisture barrier and insulate walls (R-19 to R-30) and ceiling (R-30 to R-50) to prevent moisture problems and ensure the converted space is energy-efficient.
- Install or extend HVAC to properly condition the room, avoiding undersizing by calculating for actual square footage plus 10% margin to prevent comfort and efficiency issues.
- Ensure proper egress (an operable window with at least 5.7 square feet opening or a second exterior door) and have the electrical system inspected by local authorities before finishing to maintain legal bedroom status and resale value.
Assess Your Space and Check Local Zoning Laws
Before you swing a hammer, stop and verify that converting your garage is legally allowed. Zoning laws, building codes, and homeowner association restrictions vary wildly by location. Some jurisdictions require that a primary residence retain at least one off-street parking space. Others mandate minimum ceiling heights, egress windows, or specific bathroom access for a bedroom. Call your local building department first, seriously, do this before ordering materials.
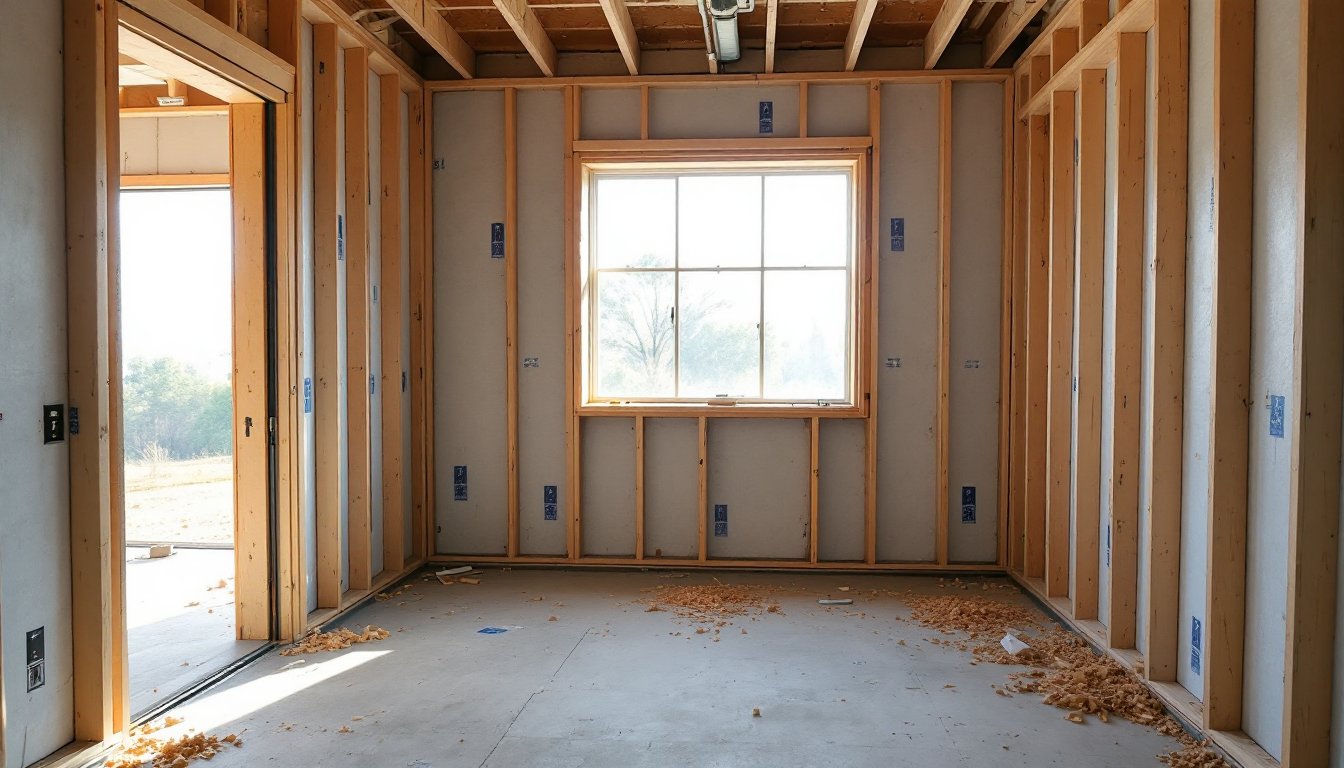
Inspect the garage itself. Is it attached or detached? What condition is the slab? Check for cracks, moisture, settlement, or pooling water around the perimeter. Look up at the roof, does it leak? Verify the ceiling height: most bedrooms need 7 feet of finished ceiling clearance, though this varies by code. Measure the actual space, garage dimensions are often smaller than you’d think when accounting for wall thickness and HVAC runs.
Note the location of the garage door opening. You’ll either fill it in with a wall (most common) or relocate the opening entirely. Also identify utility runs: electrical panel location, plumbing lines, and HVAC ducts. Garage conversions that work well are those where utilities don’t require major, code-violating reroutes. Getting a professional garage conversion plan in place before you start saves headaches later.
Plan Your Layout and Design
Determine Bedroom Essentials and Dimensions
A legal bedroom (per IRC, the International Residential Code) must have a minimum floor area. Most codes require 70 square feet of usable floor space, though some jurisdictions ask for 90. The room must also have a minimum width of 7 feet in any direction.
For actual comfort, aim for at least 100 square feet if possible. A single bed takes roughly 3×6.5 feet: a queen, about 5×6.5 feet. Account for a nightstand, a dresser, a path to the door, and the closet swing. In a cramped garage conversion, a queen bed plus minimal furniture is realistic. Ceiling height matters more than you’d think in a small room, 7 feet feels tight: 8 feet feels livable.
You’ll also need a source of light beyond the windows (no bedroom should rely solely on natural light for safety). This means running electrical, installing light fixtures, and ensuring proper outlet spacing per NEC code. Bedrooms need at least one outlet on each wall over 2 feet wide, plus dedicated circuits for heavy loads. Planning this during the layout phase prevents expensive rewiring later.
Prepare the Garage for Conversion
Prep work is where most DIYers stumble. Rushing this phase means moisture problems, poor insulation, or visible defects in the finished room.
First, clear out everything. Remove stored items, old shelving, and any bolted-down cabinets. If the garage door remains, disconnect the opener and secure the door shut or remove it entirely. If you’re keeping the door mechanically intact but sealing it (uncommon), at least disconnect power to the opener.
Inspect and repair the concrete slab. Fill cracks larger than 1/8 inch with polyurethane or epoxy crack filler. If you see efflorescence (white powder), it indicates moisture, address the source (poor drainage, rising damp) before flooring. If the slab is uneven, plan for a self-leveling compound or accept that flooring will need to bridge gaps.
Clean the slab thoroughly. Sweep, then wash with a degreaser if oil stains are present. Let it dry fully (48 hours minimum, longer in humid climates) before applying any sealant or underlayment.
Seal and Insulate for Comfort
Garages are notoriously cold and damp. Without proper sealing and insulation, your new bedroom will be uncomfortable and expensive to heat or cool.
Start with the slab. Apply a moisture barrier, either a concrete sealer or a dedicated polyethylene vapor barrier (6-mil is standard). Tape seams with acoustical-grade tape, overlapping by 6 inches. This step prevents moisture migration from the concrete into flooring and framing above.
Next, insulate the exterior walls. If you’re framing new walls (which most conversions require), you’ve got the chance to insulate before drywall. Fine Homebuilding experts recommend fiberglass batts, rigid foam, or spray foam depending on your climate and budget. In cold climates, aim for R-19 to R-30 in walls: in mild climates, R-13 is workable. The gap between concrete and the new frame is a thermal bridge, minimize air gaps by shimming studs tight to the slab or using foam sill sealer.
Insulate the ceiling if it’s an unheated attic above. R-30 to R-50 is standard for most climates. If the garage is detached, insulating the roof is critical: attached garages lose less heat through the roof but still benefit from insulation.
Install Flooring, Walls, and Climate Control
Once the slab is sealed and you’ve framed the perimeter, it’s time to build the room proper.
Framing: Standard stud layout is 16 inches on center. Most garages have been used for storage: a bedroom requires actual floor-to-ceiling framing. Build a perimeter frame of pressure-treated 2×4s directly on the sealed slab (use a concrete fastener like a powder-actuated tool or cut nails every 16 inches). From there, add vertical studs for your door, window, and wall openings. Use doubled studs around windows and full-height headers above openings wider than 2.5 feet. This isn’t complicated, it’s straightforward carpentry, but rushing it shows in the finished walls.
Drywall: Once framing is up, run electrical (if you haven’t already), then cover walls and ceiling with 1/2-inch drywall. Use drywall screws every 12 inches (studs and joists). For the ceiling, recruit a second person or rent a drywall lift, hanging ceiling drywall solo is miserable and dangerous. Tape joints with mesh tape and joint compound in two or three coats. Sand smooth between coats. It’s tedious, but it separates a professional-looking room from a sloppy one.
Climate Control: A new bedroom must be conditioned (heated or cooled). If the garage is attached to the house, you can usually extend the HVAC system, add a duct from the furnace plenum and a return line back. Run ductwork in the framed soffit or through the attic. If the garage is detached or extending HVAC is impractical, a mini-split heat pump or through-wall AC unit works. These are quieter than window units and don’t look like an afterthought. Installation varies: some require a licensed HVAC tech, so check your local codes. Real renovation projects show that undersizing HVAC is a common mistake, size your equipment for the room’s actual square footage plus a 10% margin.
Add Finishing Touches and Lighting
The last 20% of work takes 50% of the time. But this is where the bedroom becomes livable and safe.
Lighting: Run electrical rough-in before drywall if you haven’t already. Plan ceiling fixtures, wall sconces, and outlets. Bedrooms need a light switch at the entry and ideally another near the bed (three-way switches make this safe). Dimmer switches add comfort. Use LED fixtures, they run cool and save energy, especially important in a room that might get heavy use. Install at least two general-use 15-amp circuits and one dedicated 20-amp circuit for a future window unit or space heater.
Flooring: Concrete is cold and hard underfoot. Finish it with one of three approaches: vinyl plank (LVP), laminate, or carpet. LVP and laminate both need underlayment (cheap cushion layer that prevents moisture wicking and dampens sound). LVP is waterproof, ideal for a garage where micro-moisture lingers. Laminate looks warmer but isn’t moisture-proof: use only if the concrete is consistently dry. Carpet feels good but traps dust and odors in a basement-adjacent room. Whatever you choose, acclimate materials to the room’s temperature and humidity for 48 hours before installation.
Finishing Details: Paint walls with a primer-sealer (moisture-resistant) and two coats of quality latex. Eggshell or satin finish is forgiving and wipes clean. Install baseboard trim to cover the joint between wall and floor, this also hides uneven concrete edges. Caulk gaps between trim and wall for a clean look.
Add trim around the door frame and windows. Use 1×4 or 1×6 boards depending on the wall thickness. A door frame kit (pre-hung door with frame) is easier than building one from scratch. Bob Vila’s guide to garage-to-bedroom conversions emphasizes that finishing work is where attention to detail shows. Sand trim smooth, fill nail holes with putty, caulk, prime, and paint. It’s methodical but worth it.
Safety and Code Compliance: Double-check egress. If the room has one operable window, it must meet size requirements (usually minimum 5.7 square feet of opening area). If there’s no window, a second door to the exterior is required. Ensure the electrical system is grounded, bonded, and inspected by the local authority having jurisdiction. A bedroom without proper egress fails code inspection and can’t be legally rented or sold as a bedroom, it becomes a den or bonus room, which reduces resale value.